My buddy Matt drove down with me. We loaded a vocal isolation booth into a U-Haul and drove the whole thing back to Illinois. That is how I built my voice over studio cheap. Still recording in it today.
The booth cost me $1,000. I found it on Craigslist…saving $5K in the process.
That was years ago. I’m still recording in it today.
The Whisper Room: Where Building a Cheap Voice Over Studio Starts
If you’ve shopped for vocal isolation booths, you know the Whisper Room brand. New, they run anywhere from $4,000 to well over $10,000 depending on size and configuration. They’re solid, professional-grade booths used in studios and broadcast facilities. They’re also the kind of thing people put up on Craigslist when they move or when a radio station downsizes.
I found one near Nashville with a Google search and some patience. Matt drove down first to check it out so I wasn’t buying something blind. It was in good shape. We rented a U-Haul, drove down, loaded it up, and headed home. It took most of a day to unload and reassemble in my basement.
That booth is my recording studio. Everything I’ve recorded since then has come out of it.
If you’re thinking about building a home voice over studio, the first thing I’d tell you is this: the room matters more than anything else. More than the microphone. More than the preamp. More than the interface. Audio quality lives and dies in the acoustics of the space you’re recording in.
The Microphone Story
I started with an AKG condenser. No processor, just dry through a mixer. It was the nicest sounding microphone I’d ever heard. The compression on it was beautiful. I used it through my early coaching sessions and my first professional work.
Eventually I saved up enough project money to buy a Neumann TLM 103. I don’t think I’ll ever need a different microphone. It’s compact, it sounds incredible, and it sits in the booth on a wall mount next to a Sennheiser shotgun I use for radio imaging work. The Sennheiser, for the record, just looks cool.
But here’s what I learned between the AKG and the Neumann: the upgrade that made the biggest audible difference was never the microphone. It was the room treatment.
The Mistake That Taught Me the Most
My first big gear purchase after setting up the Whisper Room was a foam anti-reflection shield. The kind that mounts behind the mic on a stand, forms a little curved wall around the back of it. I bought one at Guitar Center. Spent a couple hundred dollars on it. Brought it home, set it up, and recorded with it.
It did nothing. Literally nothing that I could hear. And looking back, of course it didn’t. My issue wasn’t mic reflections from behind. My issue was the room itself. The Whisper Room needed proper acoustic treatment on the inside, not a piece of foam catching reflections three inches from the capsule.
I returned it and bought bass traps instead.
The $500 Honest Answer
If someone walked up to me with $500 and said they wanted to sound professional from a home studio, I’d say one thing: buy Auralex bass traps.
Put them in the corners of your recording space. Floor to ceiling if you can. Bass traps absorb low-frequency buildup, which is the primary culprit behind that boomy, room-sound quality that marks home recordings as amateur. Adding bass traps to the corners of my Whisper Room changed the sound of that booth more than any single equipment purchase I’ve ever made.
An average microphone in a properly treated room sounds better than a great microphone in an untreated room. Every time. Clients don’t hear what mic you’re using. They hear the quality of the audio, which is primarily a function of the room.
The Cheapest Thing That Made the Biggest Day-to-Day Difference
Wall mounts.
Both of my microphones live on wall mounts inside the Whisper Room. Neither one is on a desk stand. This means no desk artifacts, no vibration transfer, no accidental bumps that ruin a take. It also means switching between the Neumann and the Sennheiser takes three seconds instead of a whole setup sequence.
The wall mounts probably cost me under $50 total. They’ve saved me more time and frustration than any piece of gear I own.
What I’d Skip If I Were Starting Over
I bought an ISDN box off eBay for $100. Never used it.
ISDN is the broadcast-quality audio routing system that used to be standard for professional sessions. Source Connect largely replaced it. The way I actually deliver most work is: I record locally, clean up the audio, and email the files to the production house. That’s it. No routing hardware, no special connections. Just a clean audio file in their inbox.
If you’re building a home studio now, you don’t need ISDN. You probably don’t even need Source Connect to start. A professional-quality room, a good mic, and the ability to send clean audio files will get you through 95% of professional work. Add the routing tools later if clients specifically ask for them.
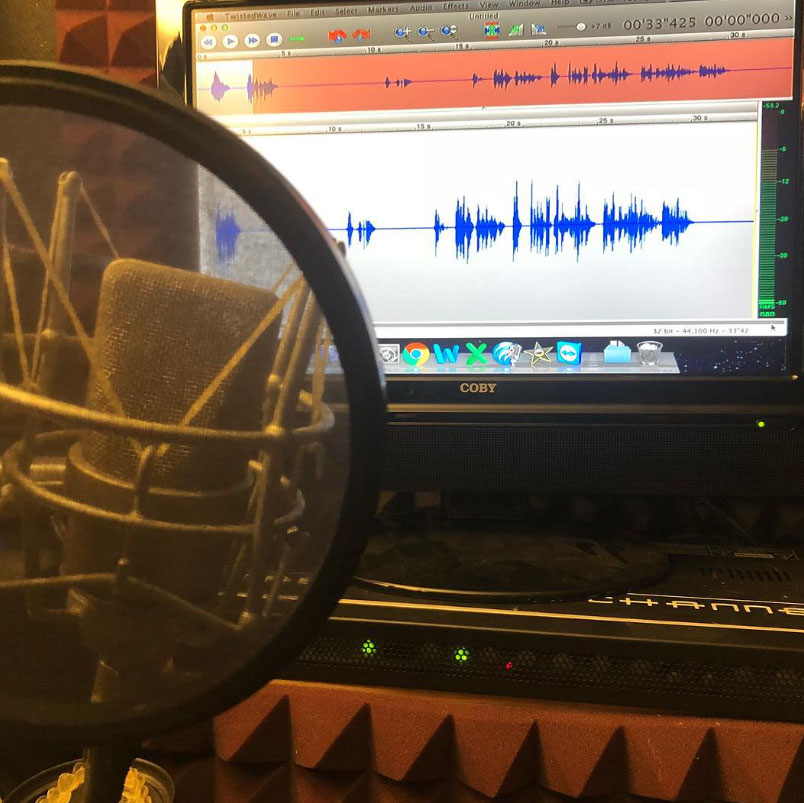
What the Studio Actually Looks Like
A Whisper Room in my basement. Neumann TLM 103 and Sennheiser shotgun on wall mounts. Auralex treatment in the corners and on the walls. A Focusrite interface. DAW on a laptop that sits outside the booth.
Total cost over several years of piece-by-piece building, with everything purchased used: probably around $3,000 to $4,000 for the whole setup. The booth alone was $1,000. Everything else came from savings earned from projects and bought secondhand.
It’s not glamorous. It sounds great.
Want to hear what the room actually sounds like? The demos page has everything.
Gear Referenced in This Post
The Whisper Room website lists current new pricing and configurations. For acoustic treatment, Auralex Acoustics is where I bought the bass traps. The microphone I use is the Neumann TLM 103.